PowerApps, Flow and Managed Metadata fields–part 3
Hi all
Welcome to part 3 of my posts that are intended to teach people more about the intricacies of Flow, SharePoint Web Services and oAuth. The cover story for this journey was the issue that presently, managed metadata fields are not supported natively in PowerApps nor Flow.
As a result, we are taking an approach where we update managed metadata values by talking to the SharePoint REST web service.
To recapitulate our journey, we have managed to achieve the following thus far. We have a basic powerapp, and a flow that now has an access token that will allow us to update the managed metadata column via API. If you are new to this series, then I strongly suggest going back and reading parts 1 and 2, before continuing here…
A SharePoint Web Service Interlude…
Those of you who got past part 2, and think the hard stuff is over, think again. You are about to take a dive into the weird world of talking to SharePoint via API, so go get yourself a coffee and I will do my best to provide an accessible explanation to what is going on.
To start with, let’s do a couple of general queries to SharePoint via API and get a feel for things. To do this, use the Chrome browser and sign into your SharePoint site collection. Once signed in, try the following URL. Note, if you are using a different list name to the one I have been using in this series, adjust accordingly:
https://<site collection url>/_api/web/lists/GetByTitle('Coffee Shop Ratings')
If this worked, you will be rewarded with a ton of data related to the Coffee Shop Ratings list. It won’t be overly meaningful in the Chrome output, but rest assured this is a good thing…
Now let’s make things a little less scary by being more specific about the information we want to retrieve…
https://<site collection url>/_api/web/lists/GetByTitle('Coffee Shop Ratings')/items?$select=Title
This API call is basically saying “get all items from this specified list, and only show me the Title column for each item” (that is what the $select=Title bit is doing). While the formatting in Chrome sucks, you can nevertheless see the output being returned in XML format. Note the title columns below showing the café names.
Now let’s get specific and select a particular item from the list by its ID. I can achieve this in the following way…
https://<site collection url>/_api/web/lists/GetByTitle('Coffee Shop Ratings')/items(16)?$Select=Title
This call is still only asking for the Title column from the list ($Select=Title), but now it only wants the item 16 in the list. I happen to know in my list this is Café Gelato and the output confirms this…
Finally for now, let’s bring back the 3 columns we are using, including the one that’s been causing us all the trouble… I do this by specifying multiple columns in the $select bit at the end of the URL.
https://<site collection url>/_api/web/lists/GetByTitle('Coffee Shop Ratings')/items(16)?$Select=Title,Rating,Beans
This time I will format the XML output a bit nicer for you and strip out some uninteresting stuff. In the <m:properties> section, you can see the information returned about our 3 columns…
A cursory glance shows the Title and Ratings columns are pretty simple. The ratings column differs from title in being numeric (m:type=”Edm.Double”) but still is a single line and fairly easy to understand. But take a look at the Beans column. It is a lot more complex than the others in that instead of being a single value, this column actually consists of three properties, Label, TermGuid and WssId.
At this point I should say that the SharePoint List API has a lot more to it than the simple examples above. If you are interested in learning more then start here. The key thing I want you to take away from this section is this: We are going to use Flow to perform queries just like we have done. We will query the lists web service to get some data and more importantly, we will also use calls to the web service to update the managed metadata column.
So let’s have a look at how we can do that…
Updating a List Item via REST API
Note: when I wrote this I was not aware you could reduce the amount of JSON manipulation you have to do via the odata=nometadata directive that Marc wrote about. I strongly suggest you use that article to sense-check what I write about here.
First up we need to understand the general pattern to updating a list item using the API. We need to issue a POST call to the list web service and in the body of our post, send our instructions about what to update. The URL is unchanged from what we have been working with…
http://<site collection url>/_api/web/lists/GetByTitle('Coffee Shop Ratings')/items(item id)
In terms of the format of the update instruction, the example below shows updating the Title field. While some bits of it might not make sense right now, we can see that the Title column is being updated to the value “TestUpdated”…
{ '__metadata': { 'type': 'SP.Data.TestListItem' },

  'Title': 'TestUpdated'

}
So what is the SP.Data.TestListItem? A hint comes from Microsoft’s own documentation that states: “The ListItemEntityTypeFullName property is especially important if you want to create and update list items. This value must be passed as the type property in the metadata that you pass in the body of the HTTP request whenever you create and update list items”
We will return to this mysterious ListItemEntityTypeFullName when we start building the flow, but for now lets park it and look at what needs to be sent in the HTTP Headers when posting to the API..
Authorization: "Bearer " + accessToken

IF-MATCH: etag or "*"

X-HTTP-Method:"MERGE"

accept: "application/json;odata=verbose"

content-type: "application/json;odata=verbose"
Wow – that’s quite a bit to do, and we have not even gotten to the Managed Metadata column yet! So let’s take a look at that now since we have already dug ourselves a bit of a theory-hole. Soon enough we will put all of this stuff into practice…
Updating a Managed Metadata Column
Now that we have seen the anatomy of a POST to update a list item, let’s now look at example of updating a managed metadata column. In a nutshell, the body of the POST looks like this: Note that in this example I have specified the ListItemEntityTypeFullName property for my Coffee Shop Ratings list. Don’t worry, I will show you how to find this out in the next section.
{

   "__metadata": { "type": "SP.Data.Coffee_x0020_Shop_x0020_RatingsListItem" },

   "Bean":

     { "__metadata": {"type":"SP.Taxonomy.TaxonomyFieldValue"},

     "TermGuid":"0937fbc2-0dfe-439e-a24f-ba6d13897abd",

    "WssId":"-1"

   }

}
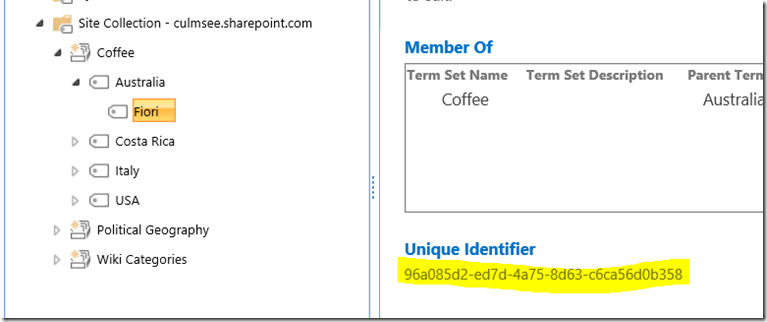
Unlike the title column above, here we need to set two parameters – a TermGuid and a WssID. The former is the GUID of a term in managed metadata and can easily be found when looking at a term: for example:
The WssID parameter you can ignore. We need to specify it, but we will always be putting “-1” in the value. If you really want to know what it does, check this post. Also for those who have read other articles on this topic and are wondering why I left out the Label parameter… the answer is that with my testing, it was not necessary, so I omitted it.
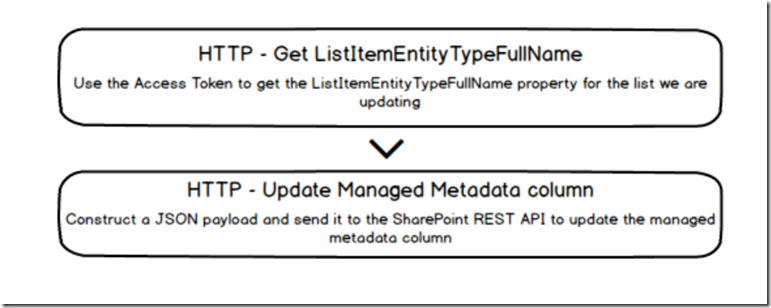
So let’s summarise our journey so far… we need to do the following:
So let’s get back to the land of Flow and finish this!
Finishing off Flow…
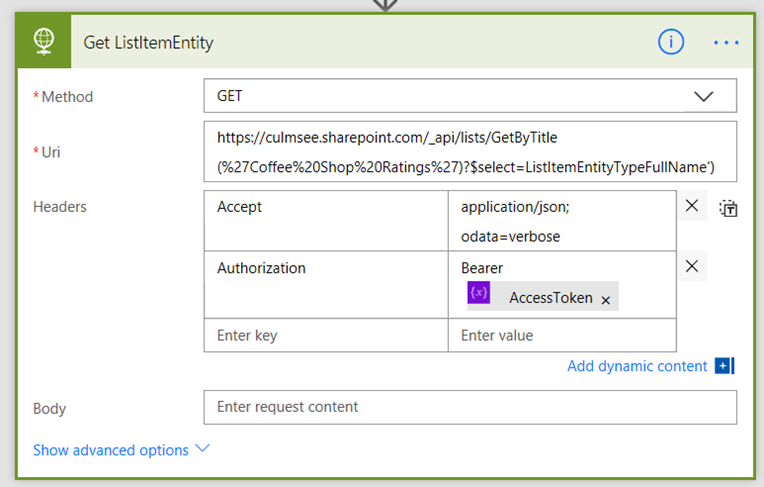
1. Picking up from where we last left off, add a HTTP action. Rename it to “Get ListItemEntity”, set it to a GET, and set the URL to:
https://<your site collection>/_api/lists/GetByTitle(%27Coffee%20Shop%20Ratings%27)?$select=ListItemEntityTypeFullName')
in my example the site collection is:
https://culmsee.sharepoint.com/_api/lists/GetByTitle(%27Coffee%20Shop%20Ratings%27)?$select=ListItemEntityTypeFullName')
Check the URL carefully. You can see that I am using the $select to only bring back the property we are interested in… ListItemEntityTypeFullName. Also note that I have encoded the spaces in the list, I.e. ‘Coffee Shop Ratings’ has now become ‘Coffee%20Shop%20Ratings’.
2. In the headers section of the request, add:
- a key called Accept, with a value of application/json; odata=verbose
- a key called Authorization, with a value of “Bearer “ and then the AccessToken variable from the Dynamic Content panel…
Now before we get to the final bit, we have another minor theory interlude. The output of the web service you just created follows a particular structure. An example output is below and I have highlighted the bit we need.
{"d":

   {"__metadata":

     { "id": <url>,

     "uri": <url>,

     "etag":"id",

     "type":"SP.List"

   },

   "ListItemEntityTypeFullName":"SP.Data.Coffee_x0020_Shop_x0020_RatingsListItem"

   }

}
This means we will need to parse this output and just grab the ListItemEntityTypeFull name parameter. The expression in Flow to do this will be:
actionBody(<Name of the workflow action you just created>)['d']['ListItemEntityTypeFullName']
So using my tenant, the expression is:
actionBody('Get_ListItemEntity')['d']['ListItemEntityTypeFullName']
Note: if you want to know more about these expressions, this is the place to go…
So with that bit of context, lets continue…
3. Add an Initialize Variable action and rename it to “Set ListitemEntity”. Name the variable ListitemEntity and make it a string. In the value, use the expression builder and use the expression I outlined above:
The final task…
Now we get to the final and most mind-bending piece of the puzzle. It is time to build the JSON payload that we will POST to SharePoint to update the managed metadata column. Let’s begin this bit with the end-in-mind and work back.
First up, we need to make a variable to store the Term ID that we will write to managed metadata. This eventually come from PowerApps, but right now we need to test so we will hard code a term.
1. Add an Initialise Variable action and name it “Set Test Term ID”. Call the variable TermGuid and make it a string. Set the value to any term in your managed metadata term set that the Beans column is using. In my case, the GUID 96a085d2-ed7d-4a75-8d63-c6ca56d0b358 refers to the term “Fiori”.
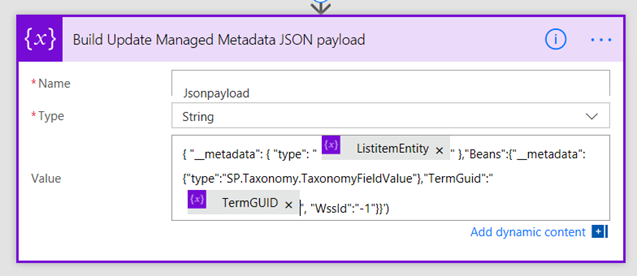
2. Add an Initialise Variable action and name it “Build Update Managed Metadata JSON payload”. Call the variable JsonPayload and make it a string. In the value field, type in
{ "__metadata": { "type": "'
…and then add the variable ListItemEntity from the Dynamic Content tab.
3. Next append the following text to the value…
" },"Beans":{"__metadata":{"type":"SP.Taxonomy.TaxonomyFieldValue"},"TermGuid":"
4. From the Dynamic Content tab, insert the TermGUID variable that you created in step 1
5. Next append the following text to the value…
", "WssId":"-1"}}
This completes the JSON payload that will update the managed metadata column. To recap, it has built the following string which is entirely consistent with the theory at the start of this article.
{ "__metadata": { "type": "SP.Data.Coffee_x0020_Shop_x0020_RatingsListItem" },

   "Beans":

     {"__metadata":{"type":"SP.Taxonomy.TaxonomyFieldValue"},

     "TermGuid":"96a085d2-ed7d-4a75-8d63-c6ca56d0b358",

     "WssId":"-1"

   }

}
Now bear in mind this payload is a string and not in JSON format yet. We will take care of that in the final HTTP call.
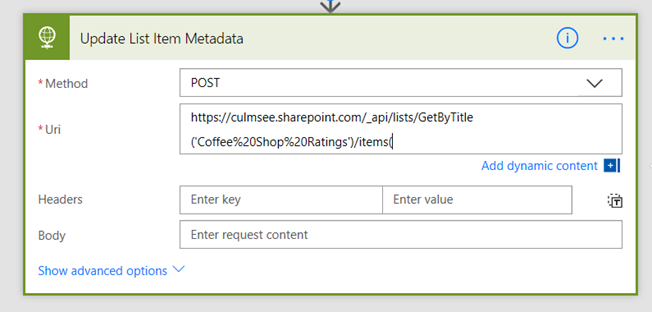
6. Add a HTTP action, name it “Update Managed Metadata” and set the method to POST. In the URL field, enter the following:
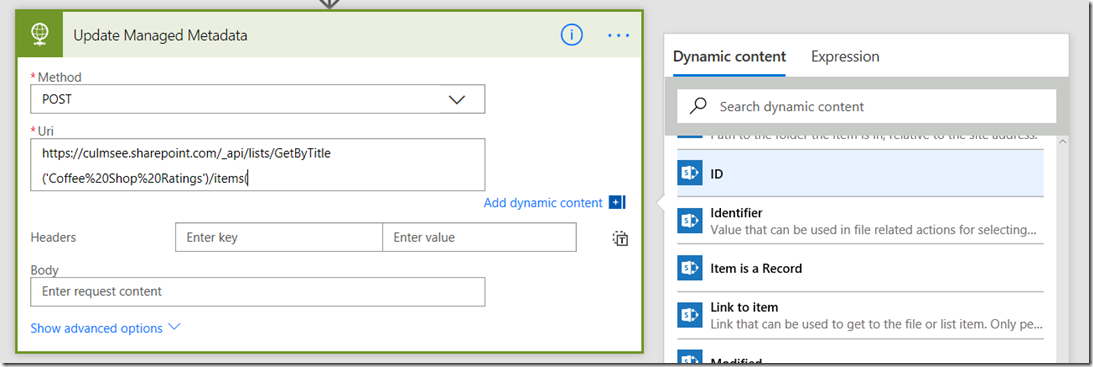
https://culmsee.sharepoint.com/_api/lists/GetByTitle('Coffee%20Shop%20Ratings')/items(
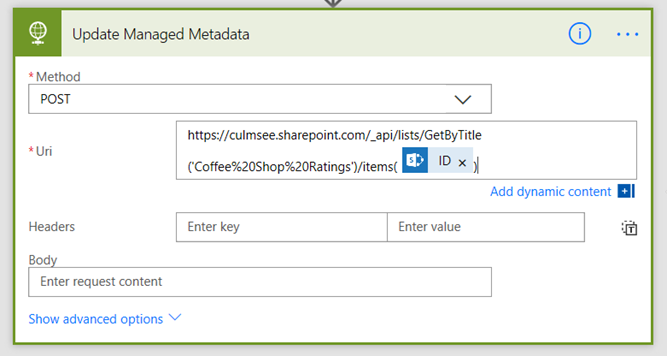
7. From the Dynamic content menu, find the CoffeePlace content, find and insert the ID field and then add a close bracket to the end…
In case you are wondering, we already know the ID of the newly created coffee shop entry because of the SharePoint – Create Item action that we created way back in part 1. Fortunately for us, that action returns the ID of the newly created item, making it easy for us to specify it in our API call. Neat eh?
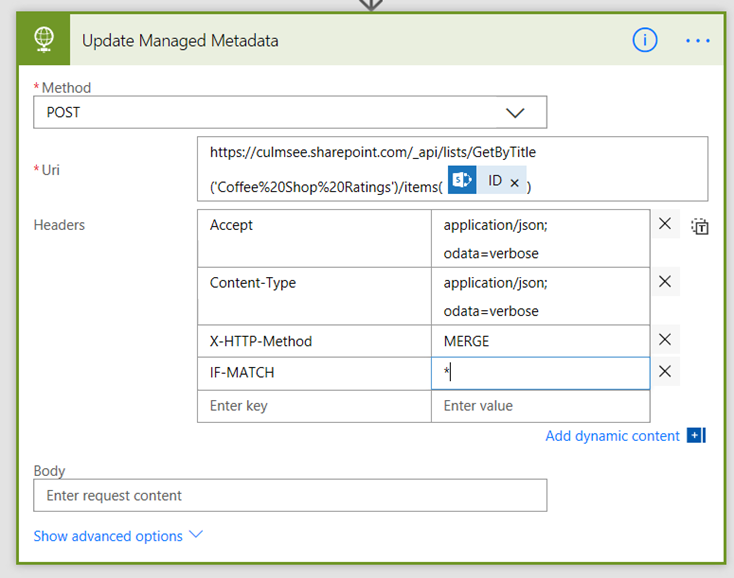
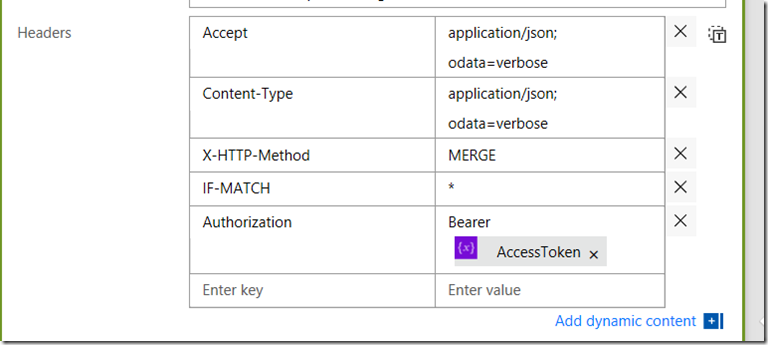
8. In the headers section, add an entry for each of the headers I described earlier in this article, namely:
- IF-MATCH: etag or “*”
- X-HTTP-Method:”MERGE”
- accept: “application/json;odata=verbose”
- content-type: “application/json;odata=verbose”
9. Now let’s add the access token that took up the bulk of part 2. In the headers, add a key called Authorize and in the value, type in:
“Bearer “ (showing quotes to illustrate a space on the end)
Then insert the variable AccessToken from the dynamic content pane…
10. Finally, let’s convert our payload to JSON and send it off. In the Body field, use the expression builder and enter the following:
json(variables('Jsonpayload'))
Are you ready???
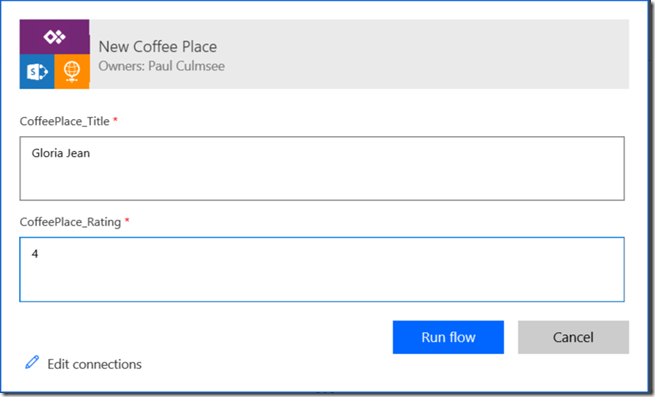
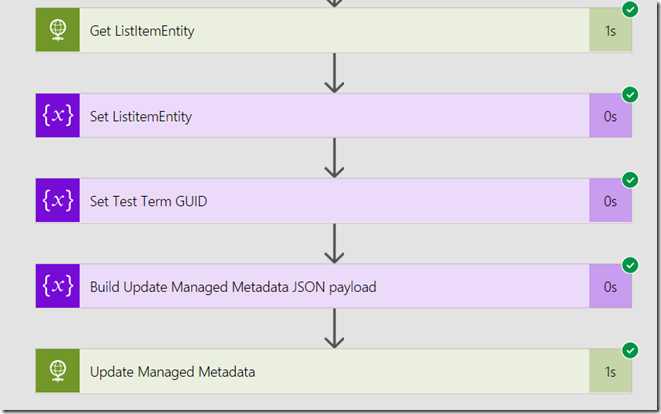
Okay, so we have wired everything up. Save the workflow and either submit a new entry via PowerApps or use the Run Now function in Flow. If all things go to plan, you should see a bunch of green. In the screenshot below, I ran from Flow and added a title and rating (no metadata of course because we are not asking PowerApps for it.
After running the workflow I see green goodness ![]()
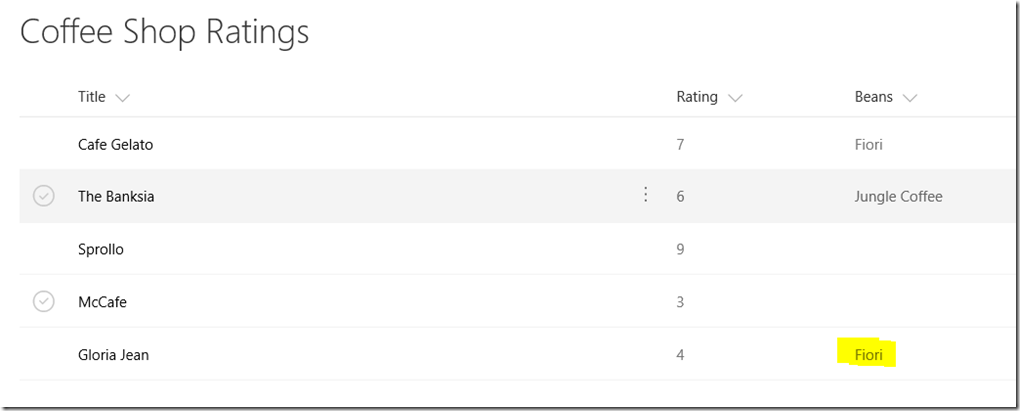
Now let’s check SharePoint for the evidence… Yeah baby!!!
Conclusion
Okay so that was quite an effort. If you have stuck with me through this, well done! Messing with JSON payloads and web services is bloody fiddly, but I have to say that understanding app principals and the SharePoint API is very useful knowledge.
You will be pleased to know that at this point the worst is over. In the next post we will return to PowerApps and set it up to send the term set item to flow, so it is not hard-coded like it is now. We will also discuss some weaknesses and limitations with this approach and look at ways we can make this whole thing a bit more resilient.
Until then, thanks for reading…
Paul Culmsee







Leave a Reply