Trials or tribulation? Inside SharePoint 2013 workflows–Part 11
Hi all, and welcome to the penultimate article in what has tuned into a fairly epic series about SharePoint 2013 Workflows. From part 6 to part 8 of this series, we implemented a workflow that made use of the web service calls as well as the new looping capabilities of SharePoint Designer 2013. We used the web service call to get all of the items in the Process Owners list, and then looped through them to find the process owner we needed based on organisation. While that method worked, the concern was that it was potentially inefficient because if there was a large list of process owners, it might consume excessive resources. This is why I referred to the approach in part 6 as the “easy but flawed” way.
Now we are going to use the “better but harder way”. To that end, the part 9 and part 10 have set the scene for this one, where we are going to implement pretty much all of the theory we covered in them. Now I will not rehash any of the theory of the journey we took to get here, but I cannot stress enough that you really should have read them before going through this article.
With that said, we are going make a bunch of changes to the current workflow by doing the following:
- 1) Change the existing workflow to grab the Organisation name as opposed to the GUID
- 2) Create a new workflow stage that gets us the X-RequestHeader (explained in part 9).
- 3) Build the URL that we will use to implement the “CAML in REST” approach (explained in part 9 and part 10)
- 4) Call the aforementioned webservice
- 5) Extract the AssignedToId of the process owner for a given organisation
- 6) Call the GetUserByID webservice to grab the actual userID of the process owner and assign them an approval task
In this post, we will cover the first four of the above steps…
Get the Name not the GUID…
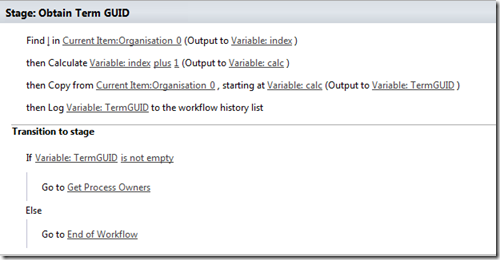
Here is the first stage of the workflow as it is now, assuming you followed parts 6 to 8.
First let’s make a few changes so that we get the Name of the Organisation stored with the current item, rather than the GUID as we are doing now. If you recall from part 4, the column Organisation_0 is a hidden column that got created because Organisation is a managed metadata column. This column stores the names and Id’s of managed metadata term(s) that have been assigned in the format of <term name>|<term GUID>. For example “Metacorp+Burgers|e2f8e2e0-9521-4c7c-95a2-f195ccad160f”.
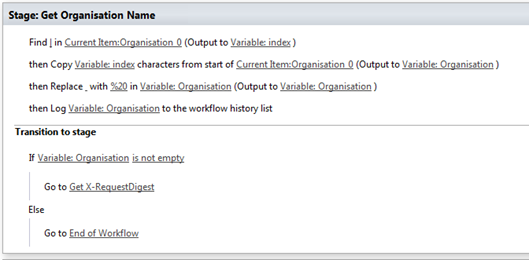
To get the GUID, we grabbed everything to the right of the pipe symbol (“|”). Now to get the name, we need everything to the left of it.
Step 1:
Rename the stage from “Obtain Term GUID” to “Get Organisation Name” (I trust that by part 11 a screenshot is not required for this)
Step 2:
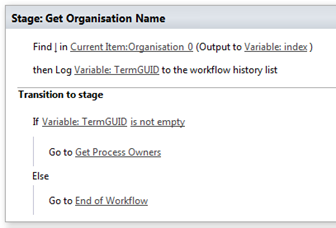
Delete the second workflow action called Calculate Variable: index plus 1 (Output to Variable:calc) as we don’t need the variable calc anymore. In addition, delete the workflow action “Copy from Current Item: Organisation_0”. You should be left with two actions and the transition to stage logic as shown below.
Step 3:
Add an Extract Substring from Start of String workflow action in between the two remaining actions. Click the “0” hyperlink and click the fx button. In the Lookup for Integer dialog, set it to the existing variable Index. Click on the “string” hyperlink and set it to the Organisation_0 column from the Current Item. Finally, click the (Output to…) hyperlink and create a new string variable called Organisation.
Now, at this point we need to pause and think about what we are doing. If you recall part 10, I had trouble getting the format right for the URL that uses CAML inside REST web service call. The culprit was that I had to encode any occurrence of a space in the URL with the HTML encoded space (a %20). Take a look at the URL that was tested in Fiddler below to see this in action…
http://megacorp/iso9001/_api/web/Lists/GetByTitle(‘Process%20Owners’)/GetItems(query=@v1)?@v1={“ViewXml”:”<View><Query><ViewFields><FieldRef%20Name=’Organisation’/><FieldRef%20Name=’AssignedTo’/></ViewFields><Where><Eq><FieldRef%20Name=’Organisation’/><Value%20Type=’TaxonomyFieldType’>Megacorp%20Burgers</Value></Eq></Where></Query></View>”}
Look toward the end of the URL where the organisation is specified (marked in bold). What do you notice?
Yep – the space between Megacorp and Burgers is also encoded. But this causes a problem since the current value of the Organisation variable contains the space. So let’s deal with this now by encoding spaces.
Step 4:
Add a Replace Substring in String workflow action. Click the first string hyperlink and type in a single space. In the second string hyperlink, type in %20. In the third string hyperlink, click the fx button and add the Organisation variable. In the final hyperlink (Output to Variable:Output), choose the variable Organisation.
After all this manipulation of the Organisation variable, it is probably worthwhile logging it to the workflow history list so we can see if the above steps work as expected.
Step 5:
Click the Log Variable:TermGUID to the workflow history list action and change the variable from TermGUID to Organisation. The action will now be called Log Variable:Organisation to the workflow history list
Step 6:
In the Transition to stage section, find the “If Variable: TermGUID is not empty” condition and change the variable from TermGUID to Organisation
Step 7:
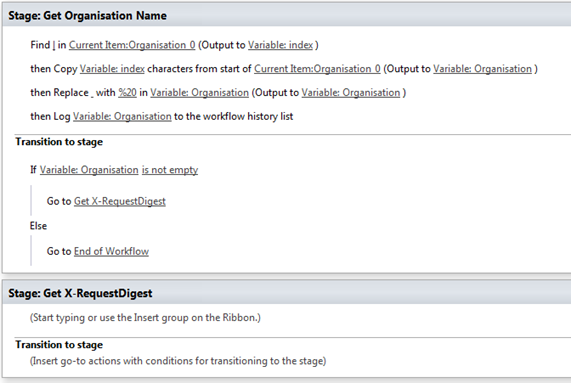
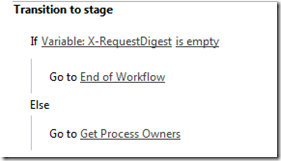
Create a new workflow stage and call it “Get X-RequestDigest”. Then in the Transition to stage section of the Get Organisation Name stage, find the “Go to Get Process Owners” and change the stage from Get Process Owners to Get X-RequestDigest.
The adjusted workflow should now look like the image below…
Getting the X-RequestDigest…
If you recall in part 9, we need to call the contextinfo web service so we can extract the FormDigestValue to use in our CAML embedded web service call to the Process Owners list. If that statement makes no sense then go back and read part 9, otherwise, you should already know what to do!.. Bring on the dictionary variables and the Call to HTTP Web service action!
Step 1:
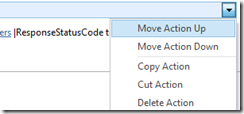
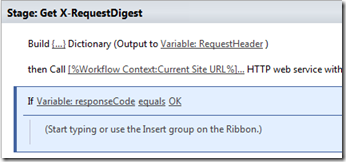
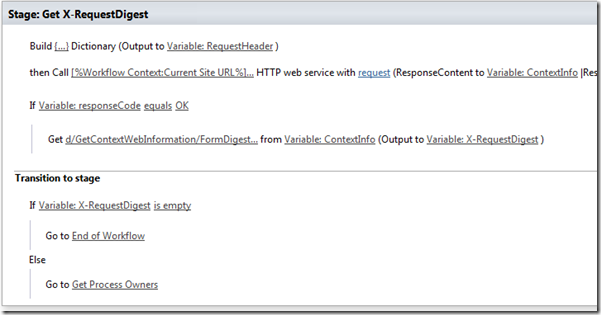
Go to the Get Process Owners stage further down and find the very first action – a Build Dictionary action that creates a variable called RequestHeader. Right click on it and choose Move Action Up. This will move the action into the Get X-RequestDigest stage as shown below.
What are we doing here? This action was the one we created in part 9 that asks SharePoint to bring back data in JSON format. We first learnt all about this in part 4 when I explained JSON and part 5 when I explained how dictionary variables work.
Step 2:
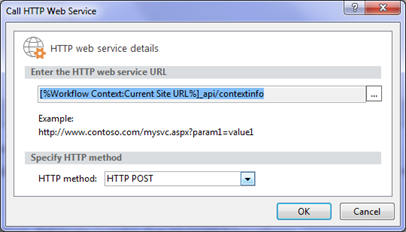
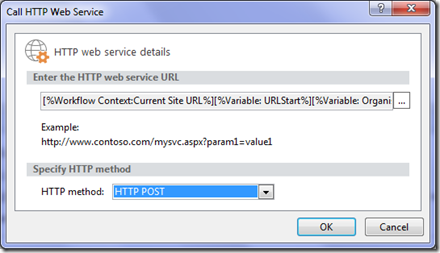
Add a Call HTTP Web Service action after the build dictionary action. For the URL, use the string builder and add a lookup to the Current Site URL (found in Workflow Context in the data source dropdown). Then add the string “_api/contextinfo” to it to complete the URL of the web service. Also, make sure the method chosen is a HTTP POST and not a GET.
This will construct the URL based on which SharePoint site the workflow is run from (eg http://megacorp/iso9001/_api/contextinfo. ) but without hard-coding the URL.
Step 3:
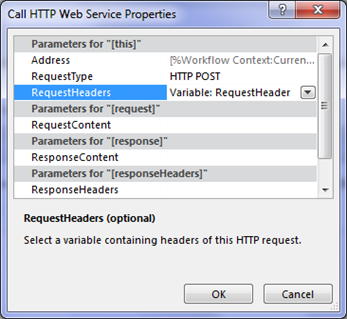
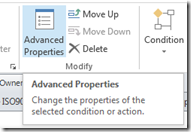
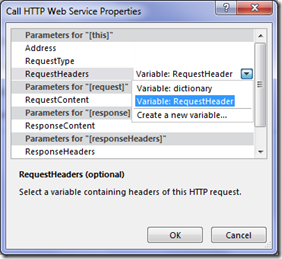
Make sure the workflow action from step 2 is selected and in the ribbon, choose the Advanced Properties icon. In the Call HTTP Web Service Parameters dialog, click the RequestHeaders dropdown and choose the RequestHeader variable and click OK. (Now you know why we moved the build dictionary action in step 1)
Step 4:
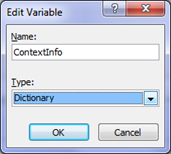
Click the response hyperlink in the Call HTTP Web Service action and choose to create a new variable. Call it ContextInfo. Also check the name of the variable for the response code and make sure it is set to the responseCode and not something like responseCode2.
Step 5:
Add an If any value equals value condition below the web service call. For the first value hyperlink, choose the variable responseCode as per step 4. Click the second value hyperlink, type in “OK” as shown below:
This action ensures that the response to the web service call was valued (OK is the same as a HTTP 200 code). If we get anything other than an OK, there is no point continuing with the workflow.
Step 6:
Inside the condition we created in step 5, add a Get an Item from a Dictionary action. Then do the following:
- In the item by name or path hyperlink, type in exactly “d/GetContextWebInformation/FormDigestValue” without the quotes.
- In the dictionary hyperlink, choose the variable ContextInfo that was specified in step 4.
- In the item hyperlink in the “Output To” section, create a new string variable called X-RequestDigest.
All this should result in the action below.
Now let’s take a quick pause to understand what we did in this step. You should recognise the d/GetContextWebInformation/FormDigestValue as parsing the JSON output. We get the value of FormDigestValue and assign it to the variable X-RequestDigest. As a reminder, here is the JSON output from calling the contextinfo web service using Fiddler. Note the path from d –> GetContextWebInformation –> FormDigestValue.
Step 7:
In the transition to stage section, add an If any value equals value condition. For the first value hyperlink, choose the variable X-RequestDigest that we created in step 6. Click the equals hyperlink and change it to is empty.
Step 8:
Under the newly created If Variable: X-Request is empty condition, add a Go to a stage action and set it to End of Workflow. In the Else section of the condition, add a Go to a stage action and set it to the Get Process Owners stage.
Cool! We have our X-Request Digest stage all done. Here is what it looks like…
This has all been very easy so far hasn’t it! A big difference to some of the previous posts. But now its time to wire up the CAML inside REST web service call, and SharePoint is about to throw us another curveball…
Get the Process Owner…
Our next step is to rip the guts out of the existing stage to get the process owner. Unlike our first solution, we no longer need to loop through the process owners list which means the entire Find Matching Process Owner stage is no longer needed. So before we add new actions, lets do some tidying up.
Step 1:
Delete the entire stage called “Find Matching Process Owner”. Do this by clicking the stage to select all actions within it, and then choose delete from the SharePoint Designer ribbon. SPD will warn you that this will delete all actions. Go ahead and click OK.
Our next step is to attempt to make the CAML inside REST web service call. To remind you of what the URL will look like, here is the one we successfully tested in part 10. Ugly isn’t it. Now you know why developers are an odd bunch – they deal with this stuff all day!
http://megacorp/iso9001/_api/web/Lists/GetByTitle(‘Process%20Owners’)/GetItems(query=@v1)?@v1={“ViewXml”:”<View><Query><ViewFields><FieldRef%20Name=’Organisation’/><FieldRef%20Name=’AssignedTo’/></ViewFields><Where><Eq><FieldRef%20Name=’Organisation’/><Value%20Type=’TaxonomyFieldType’>Megacorp%20Burgers</Value></Eq></Where></Query></View>”}
Let’s take our time here, because as you can see the URL we have to craft is complex. First up, we need to use a Build a Dictionary action to create the HTTP headers we need (including the X-RequestDigest). Recall in part 9, that we also need to set Content-length to 0 and Accept to application/json;odata=verbose.
Step 2:
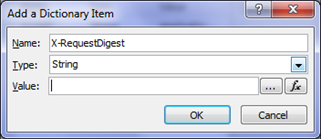
Add a Build dictionary action as the first action in the Get Process Owners section. Click the this hyperlink and the add button in the Build a Dictionary dialog. Add the following dictionary items:
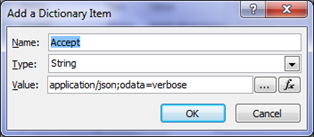
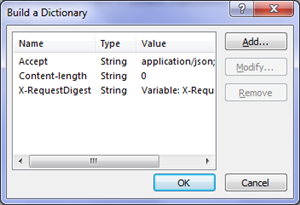
- Add a string called Accept and a value of: application/json;odata=verbose
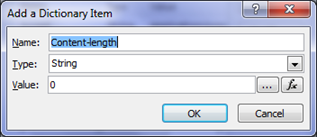
- Add a string called Content-length and a value of 0
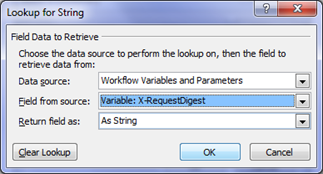
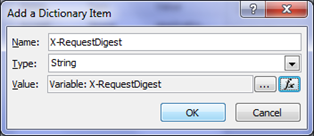
- Add a string called X-RequestDigest. In the value textbox, click the fx button and choose the workflow variable called X-RequestDigest.
Your dictionary should look like this:
Click ok and set the dictionary variable name to be the existing variable called RequestHeader. The completed action should look like the image below:
Now let’s turn our attention to creating the web service URL we need.
Step 3:
Find the existing Call HTTP Web Service action in the Get Process Owner stage. Click the URL hyperlink and click the ellipses to bring up the string builder dialog. Delete the existing URL so we can start over. Add the following entries back (carefully!)
- 1) A lookup to the Site URL from the Workflow Context
- 2) The string “_api/web/Lists/GetByTitle(‘Process%20Owners’)/GetItems(query=@v1)?@v1={“ViewXml”:”<View><Query><ViewFields><FieldRef%20Name=’Organisation’/><FieldRef%20Name=’AssignedTo’/></ViewFields><Where><Eq><FieldRef%20Name=’Organisation’/><Value%20Type=’TaxonomyFieldType’>”
- 3) A lookup to the Organisation workflow variable
- 4) The string “</Value></Eq></Where></Query></View>”}”
This should look like the image below:
A snag…
Click OK and see what happens. Uh-oh. We are informed that “Using the special characters ‘[%%]’ or [%xxx%]’ in any string, or using the special character ‘{‘ in a string that also contains a workflow lookup may corrupt the string and cause an unexpected error when the workflow runs” – Ouch!
How do we get out of this issue?
Well, we are using two workflow lookups in the string – the first being the site URL at the start and the second being the Organisation variable embedded in the CAML bit of the URL. Since it is complaining of using certain special characters in combination with workflow lookups, let’s break up the URL into pieces by creating a couple of string variables. At the start of step 3 above, we listed 4 elements that make up the URL. Let’s use that as a basis to do this…
Step 4:
Add a Set Workflow Variable action below the build dictionary action in the Get Process Owner stage. Call the variable URLStart and set its value to: _api/web/Lists/GetByTitle(‘Process%20Owners’)/GetItems(query=@v1)?@v1={“ViewXml”:”<View><Query><ViewFields><FieldRef%20Name=’Organisation’/><FieldRef%20Name=’AssignedTo’/></ViewFields><Where><Eq><FieldRef%20Name=’Organisation’/><Value%20Type=’TaxonomyFieldType’>
Step 5:
Add another Set Workflow Variable action in the Get Process Owner stage. Call the variable URLEnd and set its value to: “</Value></Eq></Where></Query></View>”}”
Step 6:
Edit the existing Call HTTP Web Service action in the Get Process Owner stage. Click the URL hyperlink and add the following entries back (carefully!)
- 1) A lookup to the Site URL from the Workflow Context
- 2) A lookup to the URLStart workflow variable
- 3) A lookup to the Organisation workflow variable
- 4) A lookup to the URLEnd workflow variable
This should look like the image below:
Click OK and in the Call HTTP Web Service dialog, make sure the HTTP method is set to HTTP POST. Click OK
Step 7:
Select the Call HTTP Web Service action and click the Advanced Properties icon in the ribbon. In the Call HTTP Web Service Properties dialog box, click the RequestHeaders parameter and in the drop down list to the right of it, choose the RequestHeader variable created in step 3. Click OK.
Step 8:
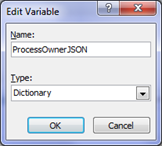
Select the Call HTTP Web Service action and click the variable next to the ResponseContent to section. Create a variable called ProcessOwnerJSON. This variable will store the JSON returned from the web service call.
Step 9:
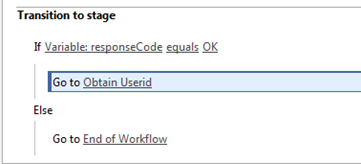
In the Transition to stage section of the Get Process Owners stage, look for the If responseCode equals OK condition. Set the stage to Obtain Userid as shown below:
Step 10:
To make the workflow better labelled, rename the existing Get Process Owners stage to Prepare and execute Process Owner web service call. This workflow stage is going to end when it has attempted the call and we will create a new stage to extract the process owner and create the approval task. At this point the workflow stage should look like the image below:
Conclusion
We will end the post at this point as it is already very long. In the next post, we will make a couple of tweaks to the Obtain Userid workflow stage and test the workflow out. For your reference, here is the complete workflow as it stands…
Thanks for reading
Paul Culmsee
















Hi Paul,
Sharing this for the benefit of anyone who hits this snag,
I am new to using http in SharePoint and I hit the same ‘snag’ you mentioned when I with the following d/results([%Variable: index%]). After spending a good 4 hours or so found out that this was because I just copy pasted the string “d/results([%Variable: index%])” directly to query builder.
The resolution was to
1. copy just d/results()
2. move cursor between the brackets
3. click “Add or Change Lookup” button
4. Select “Workflow Variables and Parameters” from as Data Source
5. Select “Variable: index” from “Field from Source”
6. Click “OK”
Now you should see “d/results([%Variable: index%])” in String builder dialog.
7. Click OK.
Try this for your issue as well.
Thank you,
Chamara (IC)
It’s worked for me !!!