Trials or tribulation? Inside SharePoint 2013 workflows–Part 7
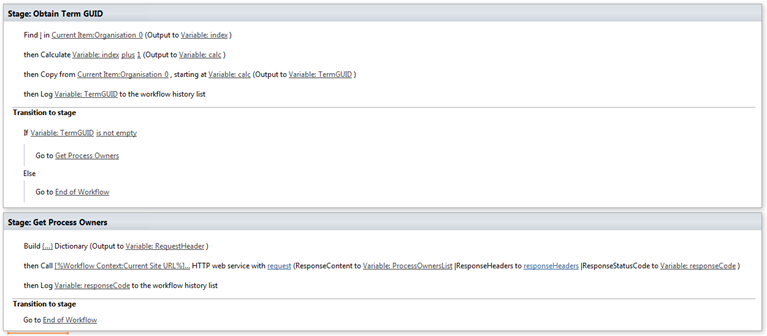
Hi and welcome to part 7 of my series of articles around SharePoint 2013 workflows. We have been examining the trials and tribulations (mainly trials so far) of implementing a relatively simple document approval workflow for a mythical organisation called Megacorp Inc. In the last post, I started illustrating the first of two approaches to filtering a list based on a managed metadata column using the Call HTTP Web Service capability. If you have been following along with me, we just successfully called the SharePoint lists web service via REST. The diagram below shows where we are at… Now it is time to work with the data that is returned.
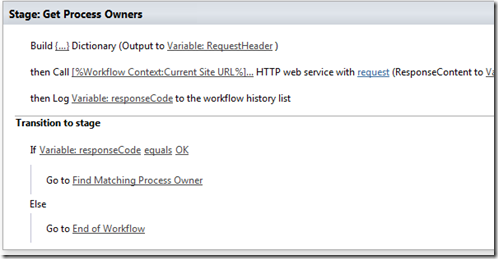
Very soon we are going to use the loop function of workflows to go through each process owner and check the GUID of the Organisation field. This is probably best done as a new workflow stage that only runs if the response code from the webservice is 200 (OK). So let’s make some minor changes to the workflow…
Step 1:
Add a new workflow stage and name it “Find Matching Process Owner”
Step 2.
In the Transition to stage section of the new stage, add a Go to a stage action and set the stage as “End of Workflow”
Step 3:
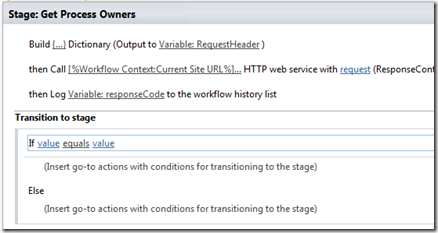
In the Transition to stage section of “Get Process Owners” Stage, delete the “Go to End of Workflow” action. In its place, add an “If any value equals value” condition
Step 4:
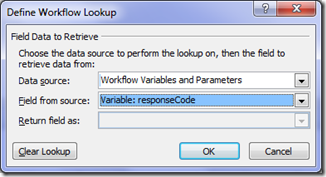
Click the first value hyperlink of the newly added condition from step 3 and click the fx button. In the Define Workflow lookup dialog, choose Workflow Variables and Parameters as the Data source and choose the responseCode variable in the Field from Source dropdown. Click OK
Step 5:
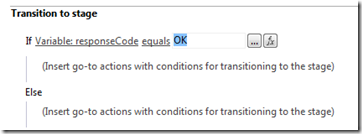
Click the second value link of the newly added condition from step 3. Type in the value “OK” and press enter.
Step 6:
Under the If Variable: responseCode equals OK condition, add a Go to a stage action. Set the stage as Find Matching Process Owner (the stage created in step 1).
Step 7.
Under the Else condition, add a Go to a stage action. Set the stage as End of Workflow
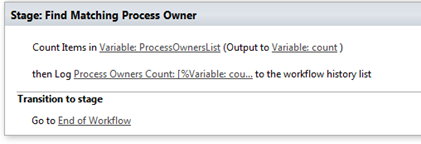
Ok, so now we have a new workflow stage to work with called Find Matching Process Owner. This is where we are going to manipulate dictionary variables and in particular, the ProcessOwnersList variable that contains the data returned by the call we made to the REST webservice in part 6. The first thing we will do is count how many items are in the ProcessOwnersList dictionary, otherwise we won’t know when to stop the loop. This is where the Count Items in a Dictionary workflow action comes in. Let’s try it on the ProcessOwnerList variable now.
Step 8:
In the Find Matching Process Owners stage, add a Count Items in a Dictionary action. Click the dictionary hyperlink and choose Variable: ProcessOwnersList from the list of dictionary variables.
Now we should check to see if the value of count is what we are expecting. For your reference, here are the 9 entries currently in the Process Owners list…
| Megacorp Defense | Paul Culmsee |
| Megacorp Burgers | Teresa Culmsee |
| Megacorp Iron Man suits | Chris Tomich |
| Megacorp Gamma Radiation Experiments | Peter Chow |
| Megacorp Pharmaceutical | Hendry Khouw |
| Megacorp Fossil Fuels | Sam Zhou |
| Perth | Du Le |
| Sydney | Paul Culmsee |
| Alaksa | Du Le |
Step 9:
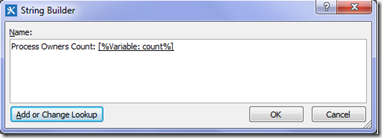
Add a Log to Workflow History action. Click the message hyperlink and click the ellipses button. In the string builder dialog, type in “Process Owners count: “
Step 10:
Click the Add or Change Lookup button. In the Lookup for string dialog, choose Workflow Variables and Parameters from the data source dropdown and choose the variable count. Click OK. You should see the following text in the string builder dialog. Click OK. Review the workflow stage and confirm it looks like the second image below.
Publish the workflow and run it. Take a look at the workflow history and see what we get. Uh-oh… what now? It says we only have 1 item in the dictionary, but we have 9 process owners. What the…?
A JSON (and fiddler) interlude…
In part 6, I stressed the point that dictionary variables can contain any type of variable available in the SharePoint 2013 Workflow platform, including other dictionary variables! This now becomes important because of the way JSON works. To explain better, it is time for me to formally introduce you Fiddler.
Fiddler is a multipurpose utility that sits between the web browser and web sites. It logs all HTTP(s) traffic and is used to view and debug web traffic. Any web developer worth their salt has Fiddler as part of the troubleshooting toolkit because of its ability to manipulate the data as it travels between browser and server. Bets of all, it can be used to compose your own HTTP requests.
So first up, install Fiddler and then start it. In your browser, head over to a web site like Google. Go back to Fiddler and you should see entries logged in the left hand panel. Click on an entry and click the inspectors tab. From here you can see all the gory detail of the conversation between your web browser and the web site. Neat eh?
If you look in the tabs in the Fiddler window, you will see one labelled Composer. Let’s use it right now… Paste the webservice URL that we used in part 6 into the composer textbox as shown below. Also, paste the string “Accept: application/json;odata=verbose” into the Request headers textbox as shown below. If you recall the HTTP interlude from part 6, this tells SharePoint to bring back the data in JSON format, rather than XML.
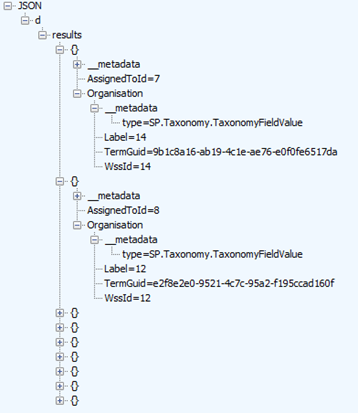
Click execute and Fiddler will send the request to the server. It will also switch to inspector mode for you to see the request and the response as it happened. If you look closely at the response (by clicking the JSON tab), you will see a structure that looks a bit like that I have pasted below. This is the same data that is now being stored in the ProcessOwnerList dictionary variable.
So why did the workflow report that there was only one item in the dictionary then? The short answer is, because there is only one item in the dictionary! A dictionary called “d”. To understand better, take another look at the JSON structure below. What is the first entry in the JSON data? a section called “d”. If you were to collapse d, all other data would be inside it. Therefore, as far as the dictionary variable is concerned, there truly is only one entry.
- JSON
  + d
Note: In case you are wondering what the deal is with the whole “d” thing, given that the it appears to be somewhat redundant. The answer that Microsoft oData standards stipulate that all data returned is wrapped by an outer “d”. Why you may ask? Well you really don’t want to know, but if you must insist, it is for security reasons related to JavaScript (see, I told you that you didn’t want to know!).
So if there is only one entry in the dictionary, than how can we get to the data we need buried deeper? The answer is that this is one of those “dictionary in a dictionary” situations that I described in part 6. The dictionary variable ProcessOwnerList has a single item. That item happens to be another dictionary with multiple items in it. So our first task is to get to the inner dictionary that contains the data we need!
Getting to the real count…
Now we will make use of the Get Item from a Dictionary action to get stuff under the d branch. Looking at the fiddler JSON output above, we need to get to the children of the results branch.
Step 1:
In the Find Matching Process Owner stage, add a Get Item from a Dictionary action as the first action in the stage.
Step 2:
Click the item by name or path hyperlink and type in “d/results”. Note: This is case sensitive, so has to match the JSON data shown in the fiddler screenshots. Click the dictionary hyperlink and choose the ProcessOwnersList dictionary variable as the source data.
Step 3:
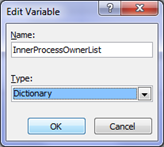
Click the item hyperlink and choose the create a new variable (the bottom option in the dropdown). Call the variable InnerProcessOwnerList and make sure it is set to type dictionary.
Step 4:
Now we need to modify the count items action to count the new variable InnerProcessOwnerList. In the Count Items action below the action we just created, click the Variable: ProcessOwnersList and change it to InnerProcessOwnerList.
Right! Let’s retest this workflow by republishing it and running it. Now that’s more like it!!!
Building the loop…
Now we get to a powerful new feature of workflows in SharePoint 2013 – the ability to perform loops. What we need to do here is loop through the 9 process owners, and for each, compare the GUID of the Organisation column to the GUID on the document from which the workflow was triggered. If the term matches, we exit the loop and assign a task to the person in the Assigned To column.
Let’s go through the process step by step.
Step 1:
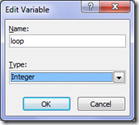
Make sure that your cursor is below the last action in the Find Matching Process Owner stage. Add a Set Workflow Variable action. Click the workflow variable hyperlink and choose to create a new variable. Call the variable loop and make it an integer. Click the value hyperlink and set it to zero “0”.
We are going to use this variable in the looping section of the workflow to get to each process owner. It’s purpose will become clear soon…
Step 2:
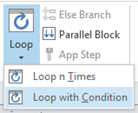
In the ribbon, click the Loop button and choose Loop with Condition. This will add a loop step into the stage. The name “1” is not exactly meaningful so lets change it. Click the title bar of the loop and change the name to For each process owner…
Now we will set the condition for how long this loop will run for. Note that we have a variable called count that stores the number of entries in the process owners list and in step 1, we created a variable called loop. We will set the workflow to loop around while the value of loop is less than the value of count.
Step 3:
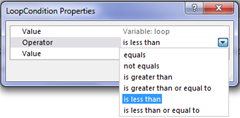
Click the leftmost value hyperlink. In the LoopCondition Properties dialog, click the fx button for the top value. In the Define Workflow Lookup dialog, choose Workflow Variables and Parameters as the data source and find the variable called loop. Click the equals dropdown and choose Is less than. Finally, click the fx button for the bottom value. In the Define Workflow Lookup dialog, choose Workflow Variables and Parameters as the data source and find the variable called count.
Step 4:
Inside the newly created loop, add a Get Item from a Dictionary action. Click the item by name or path hyperlink and click the ellipses button to display the string builder. Type in a left bracket “(“ and then click the Add or Change lookup button. In the Lookup for String dialog, choose Workflow Variables and Parameters as the data source and find the variable called loop and click OK. Finally, type in the following string “)/Organisation/TermGuid”.
If you look closely at this string, it is referring to the TermGuid in the JSON data. The value of loop (currently 0) will be used to create the string. Hence “(0)/Organisation/TermGuid” will be used to grab the first Organsiation GUID, (1)/Organisation/TermGuid for the second and so on…
Step 5:
Click the dictionary hyperlink and choose InnerProcessOwnerList.
Step 6:
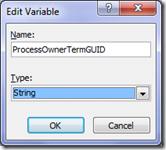
Click the item hyperlink and choose to create a new variable. Call the variable ProcessOwnerTermGUID and set it to a string.
By this stage, we should have the value of the term GUID for the process owner. Let’s log the value to workflow history so we can confirm things are working…
Step 7:
Add a log to workflow history action and click the message hyperlink. Click the fx button and in the Lookup for String dialog, choose Workflow Variables and Parameters as the data source and find the variable called ProcessOwnerTermGUID.
Step 8:
Now we need to increment the value of the loop variable so it can select the next process owner from the InnerProcessOwnerList variable. Add a Do calculation workflow action, click the first value hyperlink and click the fx button. In the Lookup for Number dialog, choose Workflow Variables and Parameters as the data source and find the variable called loop. Click the second value hyperlink and type in the value “1”.
Note that this action creates a new workflow variable (called calc1 by default) that stores the value of loop + 1. We will use this variable in the next workflow step.
Step 9:
Add a Set Workflow Variable action. Click the workflow variable hyperlink and choose loop. Click the value hyperlink and click the fx button. In the Lookup for Number dialog, choose Workflow Variables and Parameters as the data source and find the variable called calc1.
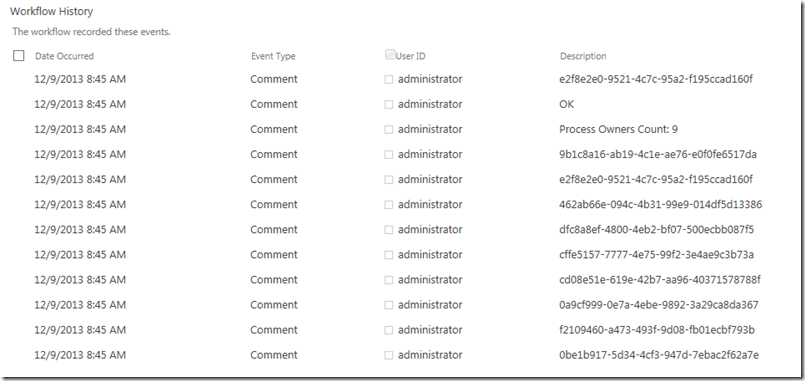
Right, that should be enough to test. The each iteration of the loop will log the Organisation term GUID for each process owner. It then increments the value of loop and does it again. Once the value of loop is equal to the value of the variable count, the loop should finish. So publish the workflow and let’s see what happens.. Brilliant! Below the count of process owners (line 3), we have looped though the process owners list and extracted the GUID for the organisation term!
Conclusion…
Well, it has taken us a while to get here, but we now have all of the information we need to be able to assign a task to the process owner. if you look in the log above, the first entry was the GUID for the organisation assigned to the document this workflow was run against. Scanning the list of GUID’s from the process owners list, we can see that the matching GUID was on line 5. So in the next post, we will modify our loop to stop when it has a match, and we will examine what we need to do to assign a task to the appropriate process owner.
Until then thanks for reading…
Paul Culmsee

















Leave a Reply