Trials or tribulation? Inside SharePoint 2013 workflows–Part 5
Hi and welcome to part 5 of my series of articles that take a peek under the hood of SharePoint 2013 workflows. These articles are pitched at wide audience, and my hope is that they give you some insights into what SharePoint Designer 2013 workflows can do (and cannot). This is a long tale of initially dashed hopes and then redemption, based around what I think is a fairly common business scenario. To that end, the scenario we are using for this series is a basic document approval workflow for a fictitious diversified multinational company called Megacorp. It consist a Documents library and Process Owners list. A managed metadata based site column called Organisation has been added to each of them. In the second post we created a very basic workflow, using the task approval action. In part 3 and part 4, we have been trying to get around various issues encountered. At the end of the last post, we just learnt that Managed Metadata column cannot be filtered via the REST calls used by the built-in SharePoint Designer workflow actions.
…or can they?
In this post, we are going to take a look at two particular capabilities of the new SharePoint 2013 workflow regime and see if we can use them to get out of this pickle we are in. Once again, a reminder that this article is pitched at a wide audience, some of whom are non developers. As a result I am taking things slow…
Capability 1: Dictionaries
SharePoint workflows have always been able to store data in variables, which allows for temporary storage of data within the workflow. When creating a variable, you have to specify what format the data is in, such as string, integer or date. In SharePoint 2013, there is a new variable type called a Dictionary. A dictionary can be used to store quite complex data, because it is in effect, a collection of other variables. Why does this matter? Well, consider this small snippet of XML data below. I could store all of this data in a single dictionary variable and call it CD, rather than multiple stand-alone variables.
  <CD>
    <ARTIST>Bob Dylan</ARTIST>
    <COUNTRY>USA</COUNTRY>
    <COMPANY>Columbia</COMPANY>
    <YEAR>1985</YEAR>
  </CD>
Now storing complex data in a single variable is all well and good, but what about manipulating it once you have it? As it happens, three new workflow actions have been specifically designed to work with dictionary data, namely:
- Build Dictionary
- Get an Item from a Dictionary
- Count Items in a Dictionary
The diagram below illustrates these actions (this figure came from an excellent MSDN article on the dictionary capability). You will be using the “Build Dictionary” and “Get an item from a dictionary” actions quite a bit before we are done with this series.
There is one additional thing worth noting with dictionaries. Something subtle but super important. A Dictionary can contain any type of variable available in the SharePoint 2013 Workflow platform, including other dictionary variables! If this messes with your head, let’s extend upon the XML example above of the Bob Dylan album. Let’s say you have an entire catalog of CD’s. For example:
<CATALOG>
   <CD>
     <ARTIST>Bob Dylan</ARTIST>
     <COUNTRY>USA</COUNTRY>
     <COMPANY>Columbia</COMPANY>
     <YEAR>1985</YEAR>
   </CD>
   <CD>
     <ARTIST>Keith Urban</ARTIST>
     <COUNTRY>USA</COUNTRY>
     <COMPANY>Columbia</COMPANY>
     <YEAR>2006</YEAR>
   </CD>
</CATALOG>
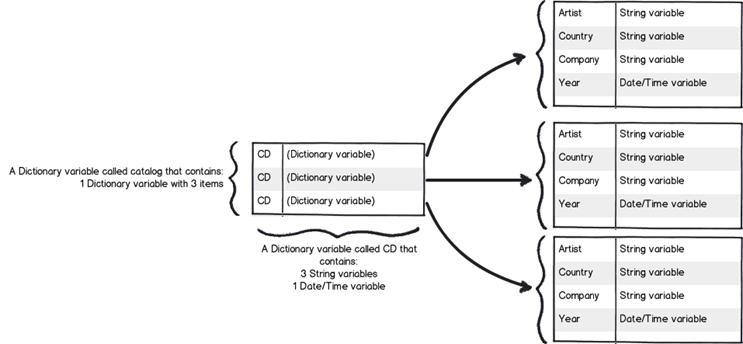
Using a dictionary, we can create a single variable to store details about all of the CD’s in the catalog. We could make a Dictionary variable called Catalog, which contains a dictionary variable called CD. The CD variable contains the string and date/time details for each individual CD. This structure enables the Catalog dictionary to store details of many CD’s. Below is a representation on what 3 CD’s would look like in this model…
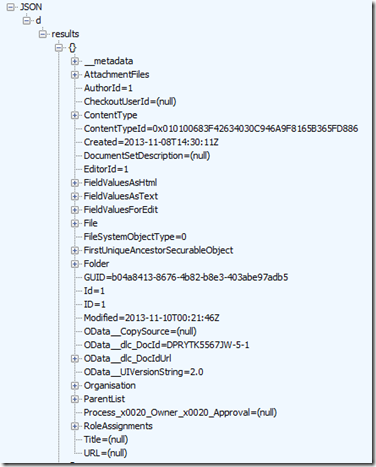
Okay, so after explaining to you this idea of a dictionary, you might be thinking “What has all of this got to do with our workflow?” To answer that, have another look at the JSON output from part 4 in this series. If you recall, this is the output from talking to SharePoint via REST and asking for all documents in the document library. What do you notice about the information that has come back? To give you a hint, below is the JSON output I will remind you what I said in the last post…
Now let’s take a closer look at Organisation entry in the JSON data. What you might notice is that some of the other data entries have data values specified, such as EditorID = 1, AuthorID = 1 and Modified = 2013-11-10. But not so with Organisation. Rather than have a data value, it has sub entries. Expanding the Organisation section and you can see that we have more data elements within it.
In case it is still not clear, essentially we are looking at a data structure that is perfectly suited to being stored in a dictionary variable. In the case of the Organisation column, it is a “dictionary within a dictionary” scenario like my CD catalog example.
Okay, I hear you say – “I get that a dictionary can store complex data structures. Why is this important?”
The answer to that my friends, is that there is a new, powerful workflow action that makes extensive use of dictionaries. You will come to love this particular workflow action, such as its versatility.
Capability 2: The one workflow action to rule them all…
In part 3 and part 4 of this series, I have shown examples of talking to SharePoint via REST webservices and showing what the returning JSON data looks like. This was quite deliberate, because In SharePoint 2013, Microsoft has included a workflow action called Call HTTP Web Service to do exactly the same thing. This is a huge advance on previous versions of SharePoint, because it means the actions that workflows can take are only limited by the webservices that they talk to. This goes way beyond SharePoint too, as many other platforms expose data via a REST API, such as YouTube, Ebay, Twitter, as well as enterprise systems like MySQL. Already, various examples exist online where people have wired up SharePoint workflows to other systems. Fabian Williams in particular has done a brilliant job in this regard.
The workflow action can be seen below. Take a moment to examine all of the bits you need to fill in as there are several parameters you might use. The first parameter (the hyperlink labelled “this”) is the URL of the webservice that you wish to access. The request parameter is a dictionary variable that is sometimes used when making a request to the webservice. The response and responseheaders variables are also dictionaries and they store the response received from the webservice. The responseCode parameter represents the HTTP response code that came back, which enables us to check if there was an error (like a HTTP 400 bad request).
Dictionaries and web services – a simple example…
The best way to understand what we can do with this workflow action (and the dictionary variables that it requires) is via example. So let’s leave our document approval workflow for the time being and quickly make a site workflow that calls a public webservice, grabs some data and displays it in SharePoint. The public webservice we will use is called Feedzilla. Feedzilla is a news aggregator service that lets you search for articles of interest and bring them back as a data feed. For example: the following feedzilla URL will display any top news (category 26) that has SharePoint in the content. It will return this information in JSON format:
http://api.feedzilla.com/v1/categories/26/articles/search.json?q=SharePoint
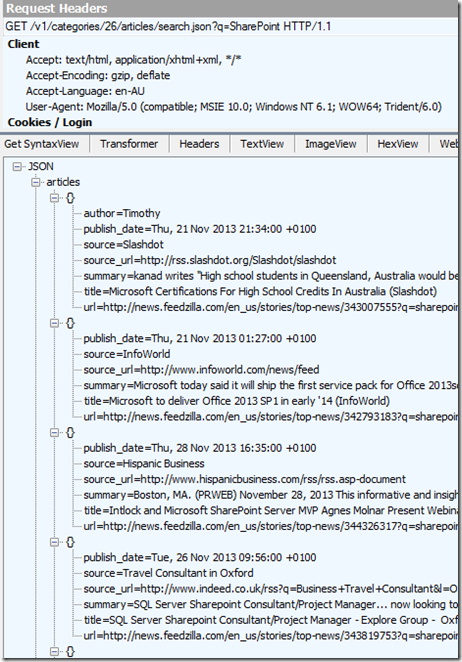
Here is a fiddler trace of the above URL, showing the JSON output. Note the structure of articles, where below the JSON label at the top we have articles –> {} and then the properties of author, publish_date, source, source_url, summary, title and url.
Therefore the string “articles(0)/title” should return us the string “Microsoft Certifications for High School Students in Australia (Slashdot)” as it is the title of the first article. The string articles(1)/title should bring back “Microsoft to deliver Office 2013 SP1 in early ’14 (InfoWorld)” as it is the second article. So with this in mind, let’s see if we can get SharePoint to extract the title of the first article in the feed.
Testing it out…
So let’s make a new site workflow based workflow.
Step 1:
From the ribbon, choose Site Workflow. Call the site workflow “Feedzilla test” as shown below…
Now we will add our Call HTTP Web Service action. This time, we will add the action a different way.
Step 2:
Click the flashing cursor underneath the workflow stage and type in “Call”. As you type in each letter, SharePoint Designer will suggest matching actions. By the time you write “call”, there is only the Call HTTP Web Service action to choose from. Pressing enter will add it to the workflow.
Step 3:
Now click on the “this” hyperlink and paste in the feedzilla URL of: http://api.feedzilla.com/v1/categories/26/articles/search.json?q=SharePoint. Then click OK.
Next, we need to create a dictionary variable to store the JSON data that is going to come back from Feedzilla.
Step 4:
Click on the “response” hyperlink next to the “ResponseContent to” label and choose to Create a new variable…
Step 5:
Call the variable JSONResponse and confirm that it’s type is Dictionary. We are now done with the Call HTTP web service action.
Step 6:
Next step in the workflow is to extract just the article title from the JSON data returned by the web service call. For this, we need to use the Get an Item from a Dictionary action. We will use this action to extract the title property from the very first article in the feed. Type in the word “get” and press enter – the action we want will be added…
Step 7:
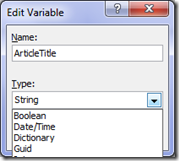
In the “item by name or path” hyperlink next to the Get label, type in this exactly: articles(0)/title as shown below. Then click on the “dictionary” hyperlink next to the from label and choose the JSONResponse variable that was created earlier. Finally, we need to save the extracted article title to a string variable. Click on the “this” hyperlink next to the Output to label and choose Create a new variable… In the edit variable screen, name the variable ArticleTitle and set its Type to String.
Step 8:
The next step is to log the contents of the variable ArticleTitle to the workflow history list. The action is called Log to History List as shown below. Click the “message” hyperlink for this action and click the fx button. Choose Workflow Variables and Parameters from the Data Source dropdown and in the Field from Source dropdown, choose the variable called ArticleTitle. Click OK.
Step 9:
Finally, add a Go to End of Workflow action in the Transition to Stage section. The workflow is now complete and ready for testing.
Testing the workflow…
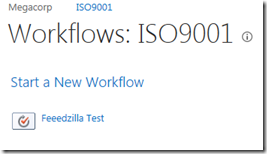
To run a site workflow, navigate to site contents in SharePoint, and click on the SITE WORKFLOWS link to the right of the “Lists, Libraries and other Apps” label. Your newly minted workflow should be listed under the Start a New Workflow link. Click your workflow to run it.
The workflow will be fired off in the background, and you will be redirected back to the workflow status screen. Click to refresh the page and you should see your workflow listed as completed as shown below…
Click on the workflow link in the “My Completed Workflows” section and examine the detailed workflow output. Look to the bottom where the workflow history is stored. Wohoo! There is our article name! It worked!
Conclusion…
It was nice to have a post that was more tribulation than trial eh?
By now you should be more familiar with the idea of calling HTTP web services within workflows and parsing dictionary variables for the output. This functionality is really important because it opens up possibilities for SharePoint workflows that were previously not possible. For citizen developers, the implication (at least in a SharePoint context) is that understanding how to call a web service and parse the result is a must. Therefore all that REST/oData stuff you skipped in part 4 will need to be understood to progress forward in this series.
Speaking of progressing forward, in the next post, we are going to revisit our approval workflow and see if we can use this newfound knowledge to move forward. First up, we need to find out if there is a web service available that can help us look up the process owner for an organisation. To achieve this, we are going to need to learn more about the Fiddler web debugging tool, as well as delve deeper into web services than you ever thought possible. Along the way, SharePoint will continue to put some roadblocks up but fear not, we are turning the corner…
Until then, thanks for reading and I hope these articles have been helpful to you.
Paul Culmsee









hi!
i am trying to build a SPD Wrokflow, i am testing a simple call to the Rest web services (TFS Odata) but unf. when i publish to my o365 site and run it stuck when workflow trying to call the web services.
it should may include the Authorization, which i dont know, could please help!
ps. the web service address is like as following:
https://xxxxxxxx.cloudapp.net/DefaultCollection/Projects('xxxxxxxxx‘)/WorkItems
This post right here has helped me understand dictionaries, how to call a web service via workflow, and how to parse out the returned JSON result that I wasn’t clear on this before reading this post. I will be looking through the rest of your blog posts to see what other helpful information you may have out there. Thank you for taking the time to put this series together!
As a citizen developer I would like to thank you for this series of posts and the way you have written it. As Linda said, thank you for taking the time to put this series together.
Onwards and upwards!
I tried building SPD 2013 workflow, working on call rest web service when i click on stage1 ,items not displaying on office 365 site.
Error below:
https://epmsolutions.sharepoint.com/sites/TeamSite8/_layouts/15/wrkstat.aspx?List=273b5155-e602-451f-89ac-503c0e7cca2d&WorkflowInstanceName=6550d43e-eb8a-466e-ad0a-60ff4c0ef023
https://epmsolutions.sharepoint.com/sites/TeamSite8/Lists/Customer/AllItems.aspx
please help me in fixing this issue. send me details to be corrected.
Thank you